How to use Flask with gevent (uWSGI and Gunicorn editions)
来源:https://iximiuz.com/en/posts/flask-gevent-tutorial/
Disclaimer: I wrote this tutorial because gevent saved our project a few years ago and I still see steady gevent-related search traffic on my blog. So, the way gevent helped us may be useful for somebody else as well. Since I still have some handy knowledge I decided to make this note on how to set up things. However, I’d not advise starting a new project in 2020 using this technology. IMHO, it’s aging and losing the traction._
TL;DR: check out code samples on GitHub.
Python is booming and Flask is a pretty popular web-framework nowadays. Probably, quite some new projects are being started in Flask. But people should be aware, it’s synchronous by design and ASGI is not a thing yet. So, if someday you realize that your project really needs asynchronous I/O but you already have a considerable codebase on top of Flask, this tutorial is for you. The charming gevent library will enable you to keep using Flask while start benefiting from all the I/O being asynchronous. In the tutorial we will see:
- How to monkey patch a Flask app to make it asynchronous w/o changing its code.
- How to run the patched application using gevent.pywsgi application server.
- How to run the patched application using Gunicorn application server.
- How to run the patched application using uWSGI application server.
- How to configure Nginx proxy in front of the application server.
- [Bonus] How to use psycopg2 with psycogreen to make PostgreSQL access non-blocking.
When do I need asynchronous I/O
The answer is somewhat naive - you need it when the application’s workload is I/O bound, i.e. it maxes out on latency SLI due to over-communicating to external services. It’s a pretty common situation nowadays due to the enormous spread of microservice architectures and various 3rd-party APIs. If an average HTTP handler in your application needs to make 10+ network requests to build a response, it’s highly likely that you will benefit from asynchronous I/O. On the other hand, if your application consumes 100% of CPU or RAM handling requests, migrating to asynchronous I/O probably will not help.
What is gevent
From the official site description:
gevent is a coroutine-based Python networking library that uses greenlet to provide a high-level synchronous API on top of the libev or libuv event loop.
The description is rather obscure for those who are unfamiliar with the mentioned dependencies like greenlet, libev, or libuv. You can check out my previous attempt to briefly explain the nature of this library, but among other things it allows you to monkey patch normal-looking Python code and make the underlying I/O happening asynchronously. The patching introduces what’s called cooperative multitasking into the Python standard library and some 3rd-party modules but the change stays almost completely hidden from the application and the existing code keeps its synchronous-alike outlook while gains the ability to serve requests asynchronously. There is an obvious downside of this approach - the patching doesn’t change the way every single HTTP request is being served, i.e. the I/O within each HTTP handler still happens sequentially, even though it becomes asynchronous. Well, we can start using something similar to asyncio.gather() and parallelize some requests to external resources, but it would require the modification of the existing application code. However, now we can easily scale up the limit of concurrent HTTP requests for our application. After the patching, we don’t need a dedicated thread (or process) per request anymore. Instead, each request handling now happens in a lightweight green thread. Thus, the application can serve tens of thousands of concurrent requests, probably increasing this number by 1-2 orders of magnitude from the previous limit.
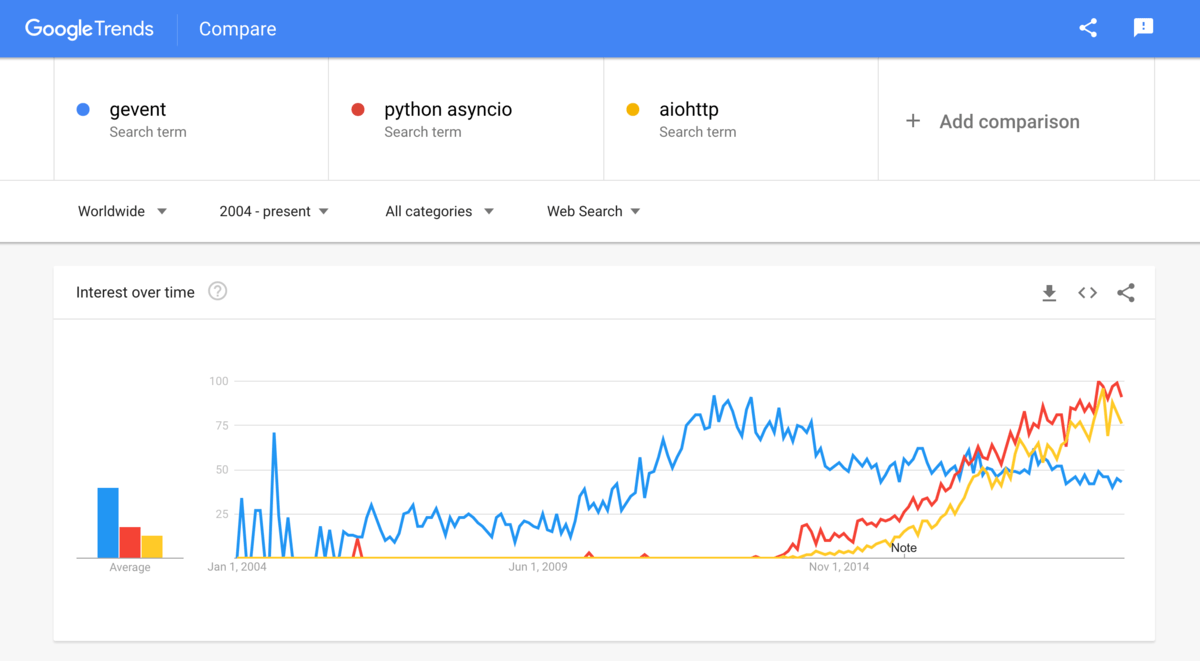
However, while the description sounds extremely promising (at least to me), the project and the surrounding eco-system is steadily losing traction (in favor of asyncio and aiohttp?):
Create simple Flask application
The standard tutorial format always seemed boring to me. Instead, we will try to make a tiny playground here. We will try to create a simple Flask application dependant on a sleepy 3rd party API endpoint. The only route of our application will be responding with some hard-coded string concatenated with the API response text. Having such a workload, we will play with different methods of achieving high concurrency in the Flask’s handling of HTTP requests.
First, we need to emulate a slow 3rd party API. We will use aiohttp to implement it because it’s based on the asyncio library and provides high concurrency for I/O-bound HTTP requests handling out of the box:
|
|
We can launch it in the following Docker container:
|
|
Now, it’s time to create the target Flask application:
|
|
As promised, it’s fairly simple.
Deploy Flask application using Flask dev server
The easiest way to run a Flask application is to use a built-in development server. But even this beast supports two modes of request handling.
In the single-threaded mode, a Flask application can handle no more than one HTTP request at a time. I.e. the request handling becomes sequential.
Experience 🤦
This mode can be dangerous. If an application needs to send a request to itself it may get stuck in a deadlock.
In the multi-threaded mode, Flask spawns a thread for every incoming HTTP request. The maximal concurrency, i.e. the highest possible number of simultaneous threads doesn’t seem configurable though.
We will use the following Dockerfile to run the Flask dev server:
|
|
Let’s spin up the first playground using handy Docker Compose:
|
|
After running docker-compose build and docker-compose up we will have two instances of our application running. The single-threaded version is bound to the host’s 127.0.0.1:3000, the multi-threaded - to 127.0.0.1:3001.
|
|
It’s time to serve the first portion of HTTP requests (using lovely ApacheBench). We will start from the single-threaded version and only 10 requests:
|
|
As expected, we observed no concurrency. Even though we asked ab to simulate 5 simultaneous clients using -c 5, it took ~10 seconds to finish the scenario with an effective request rate close to 1 per second.
If you execute top -H in the server container to check the number of running threads, the picture will be similar to this:
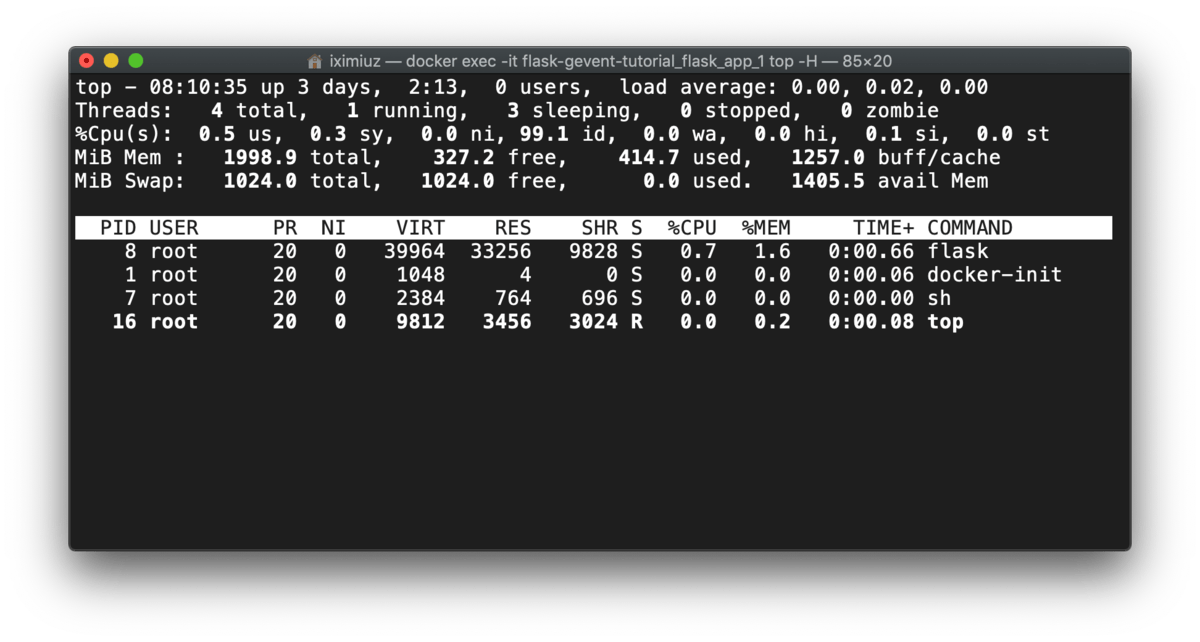
docker exec -it flask-gevent-tutorial_flask_app_1 top -H
Let’s proceed to the multi-threaded version alongside with increasing the payload up to 2000 requests being produced by 200 simultaneous clients:
|
|
The effective concurrency grew to the mean of 124 requests per second, but a sample from top -H shows, that at some point of time we had 192 threads and 190 of them were sleeping:
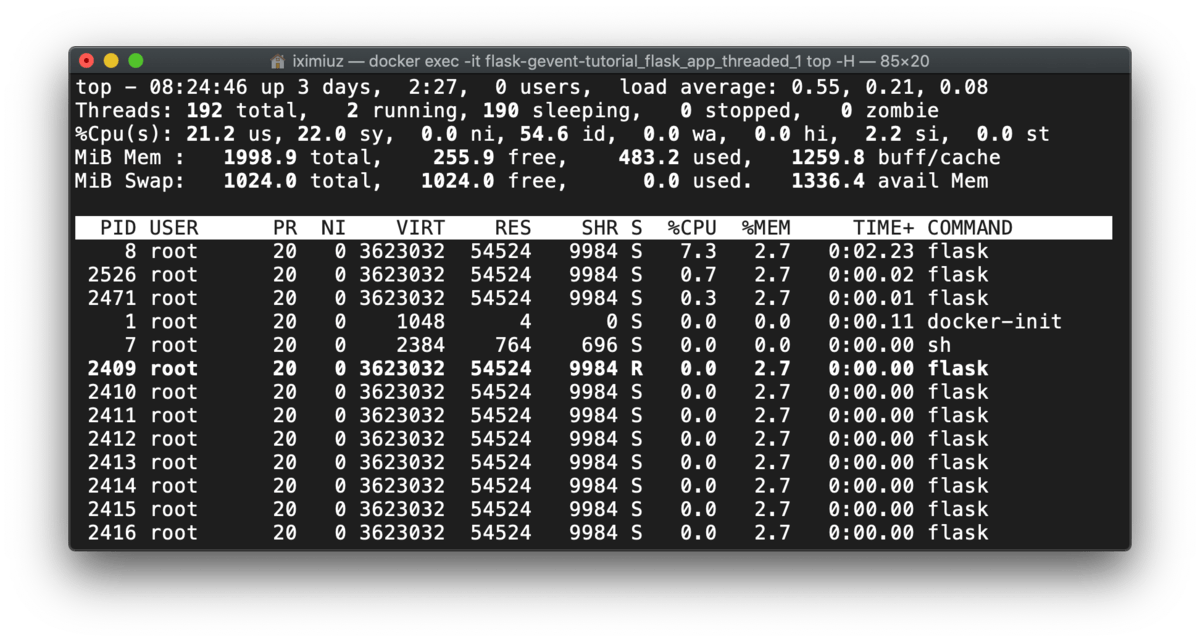
docker exec -it flask-gevent-tutorial_flask_app_threaded_1 top -H
Deploy Flask application using gevent.pywsgi
The fastest way to unleash the power of gevent is to use its built-in WSGI-server called gevent.pywsgi.
We need to create an entrypoint:
|
|
Notice, how it patches our Flask application. Without monkey.patch_all() there would be no benefit from using gevent here because all the I/O in the application stayed synchronous.
The following Dockerfile can be used to run the pywsgi server:
|
|
Finally, let’s prepare the following playground:
|
|
And launch it using:
|
|
We expect a decent concurrency level with very few threads (if any) in the server container:
|
|
Executing top -H shows that we DO have some python threads (around 10). Seems like gevent employs a thread pool to implement the asynchronous I/O:
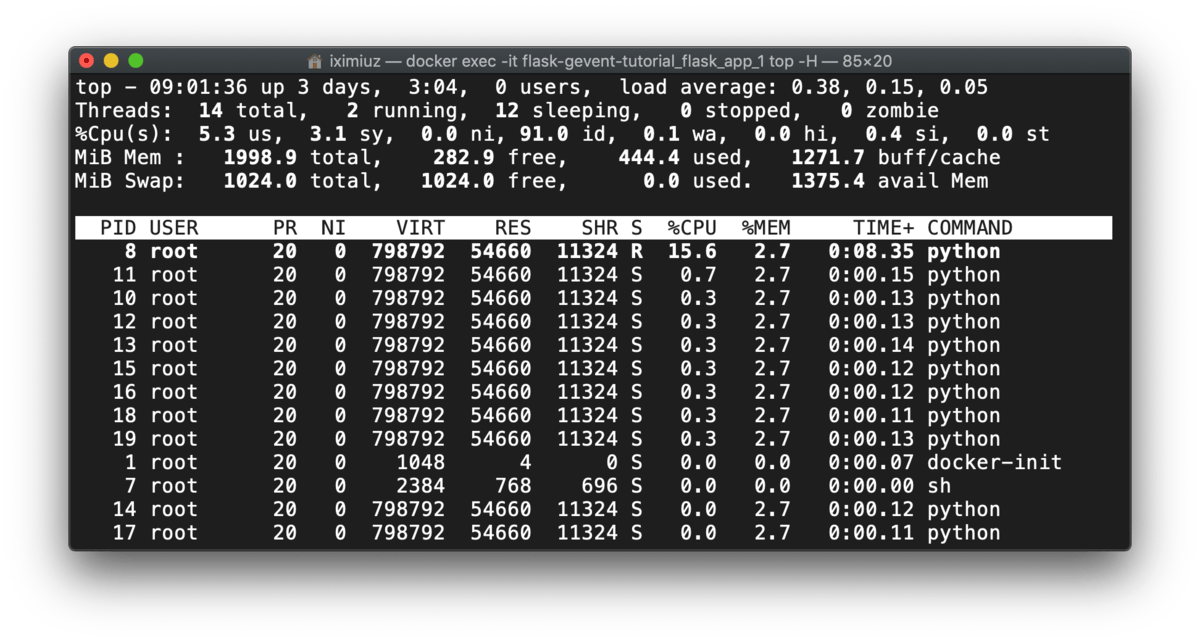
docker exec -it flask-gevent-tutorial_flask_app_1 top -H
Deploy Flask application using Gunicorn
Gunicorn is one of the recommended ways to run Flask applications. We will start from Gunicorn because it has slightly fewer parameters to configure before going than uWSGI.
Gunicorn uses the worker process model to serve HTTP requests. But there are multiple types of workers: synchronous, asynchronous, tornado workers, and asyncio workers.
In this tutorial, we will cover only the first two types - synchronous and gevent-based asynchronous workers. Let’s start from the synchronous model:
|
|
Notice that we reuse the original app.py entrypoint without any changes. The synchronous Gunicorn playground looks as follows:
|
|
Let’s build and start the server using 4 workers x 50 threads each (i.e. 200 threads in total):
|
|
Obviously, we expect a high number of requests being served concurrently:
|
|
But if we compare the samples from top -H before and after the test, we can notice an interesting detail:
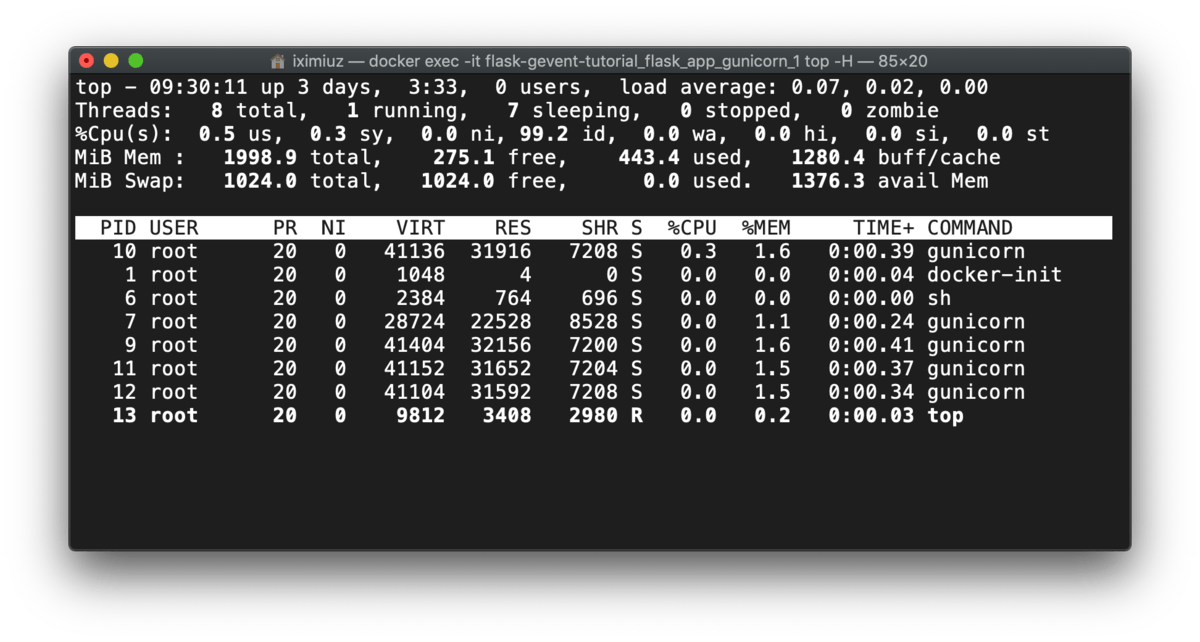
docker exec -it flask-gevent-tutorial_flask_app_gunicorn_1 top -H (before test)
Gunicorn starts workers on the startup, but the workers spawn the threads on-demand:
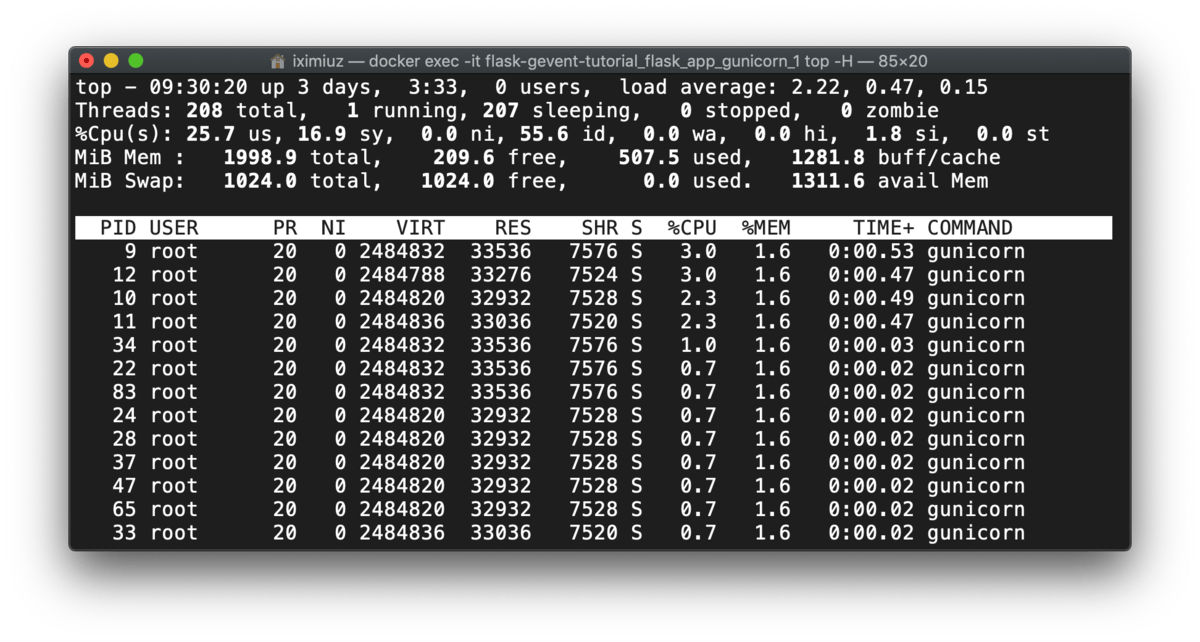
docker exec -it flask-gevent-tutorial_flask_app_gunicorn_1 top -H (during test)
Now, let’s switch to gevent workers. For this setup we need to make a new entrypoint to apply the monkey patching:
|
|
The Dockerfile to run Gunicorn + gevent:
|
|
|
|
Let’s start it:
|
|
And conduct the test:
|
|
We observe similar behavior - only worker processes are alive before the test:
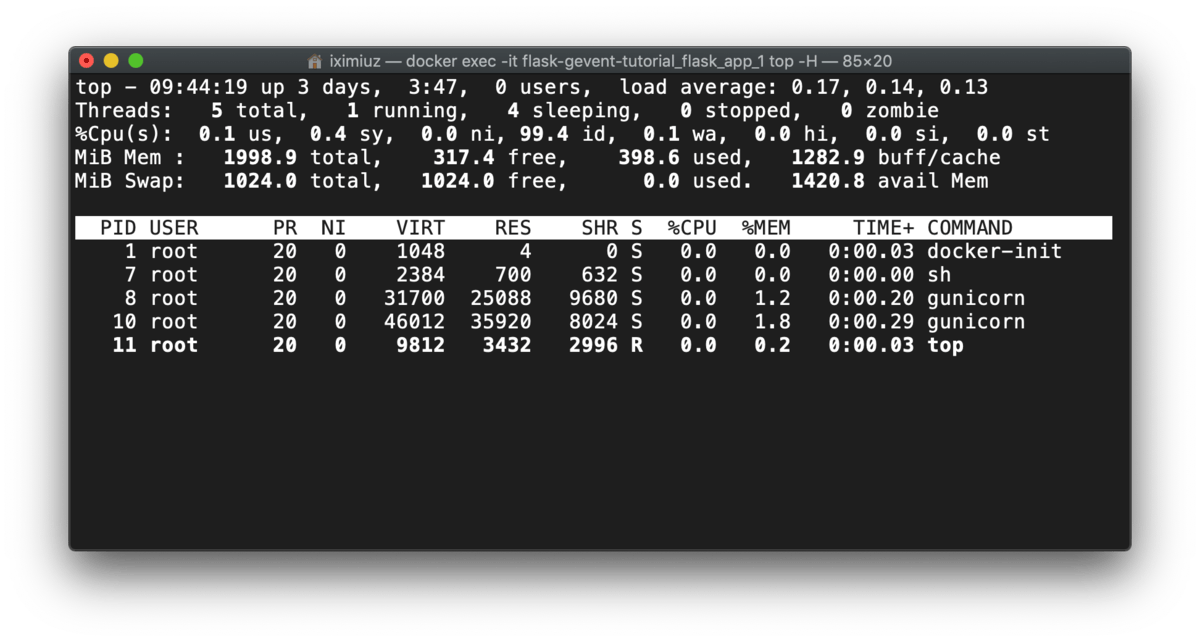
docker exec -it flask-gevent-tutorial_flask_app_gunicorn_1 top -H (before test)
But during the test, we see 10 new threads spawned. Notice, how it resembles the number of threads used by pywsgi:
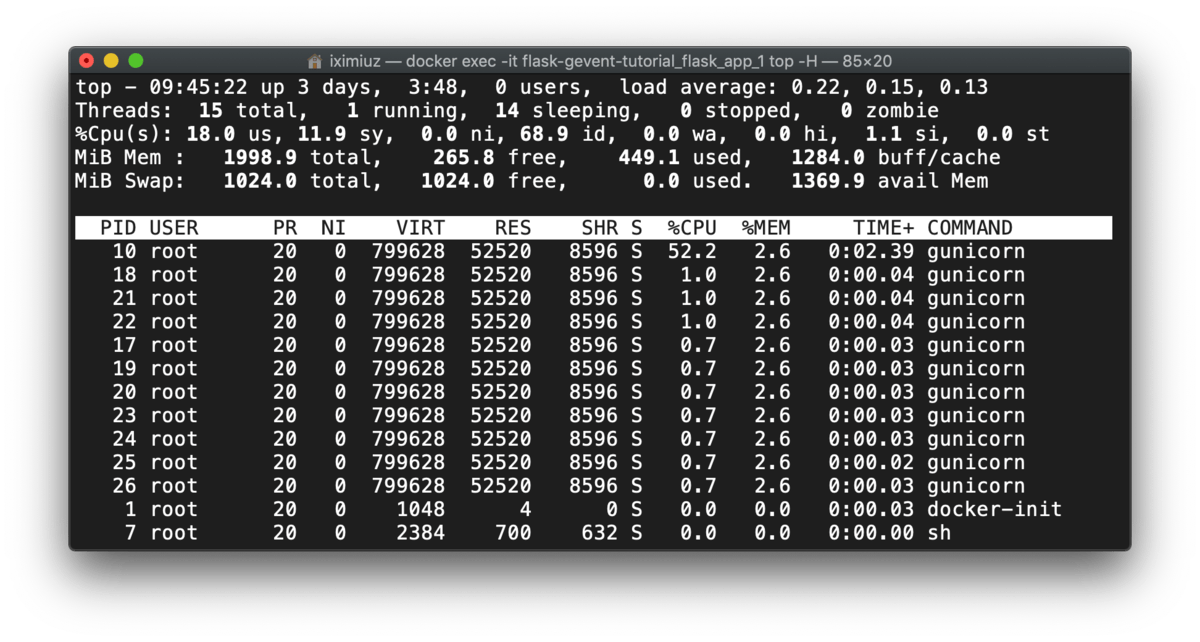
docker exec -it flask-gevent-tutorial_flask_app_gunicorn_1 top -H (during test)
Deploy Flask application using uWSGI
uWSGI is a production-grade application server written in C. It’s very fast and supports different execution models. Here we will again compare only two modes: synchronous (N worker processes x K threads each) and gevent-based (N worker processes x M async cores each).
First, the synchronous setup:
|
|
We use an extra parameters --protocol and the playground sets it to http:
|
|
We again limit the concurrency by 200 simultaneous HTTP requests (4 workers x 50 threads each):
|
|
Let’s send a bunch of HTTP requests:
|
|
uWSGI spaws workers and threads beforehand:
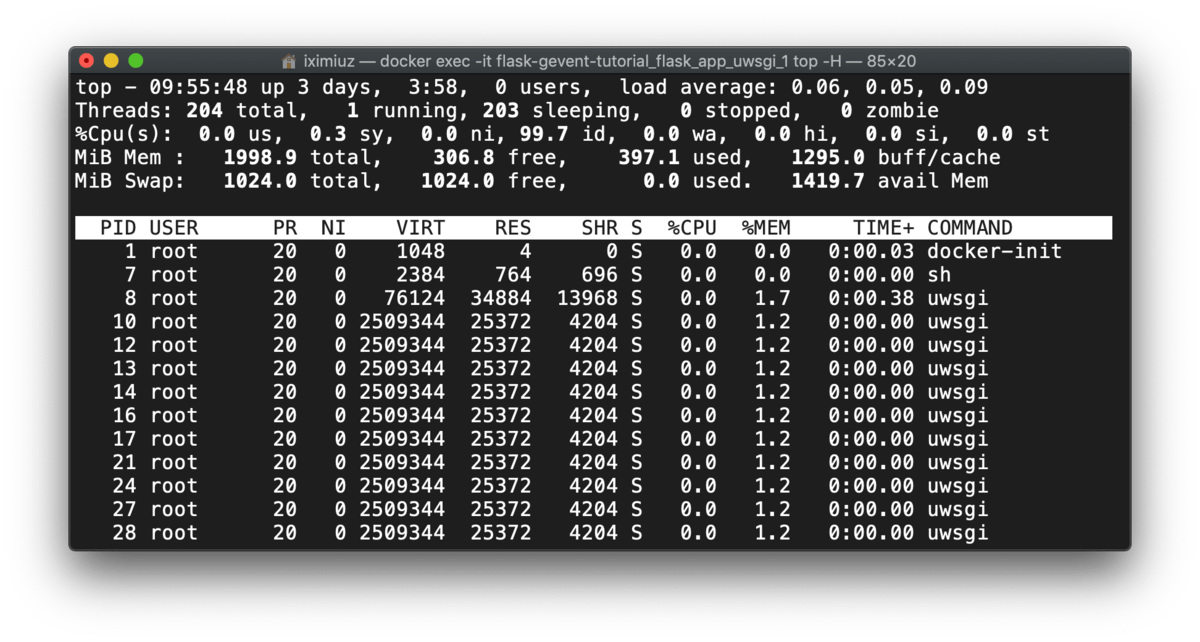
docker exec -it flask-gevent-tutorial_flask_app_uwsgi_1 top -H (before test)
So, only the load changes during the test:
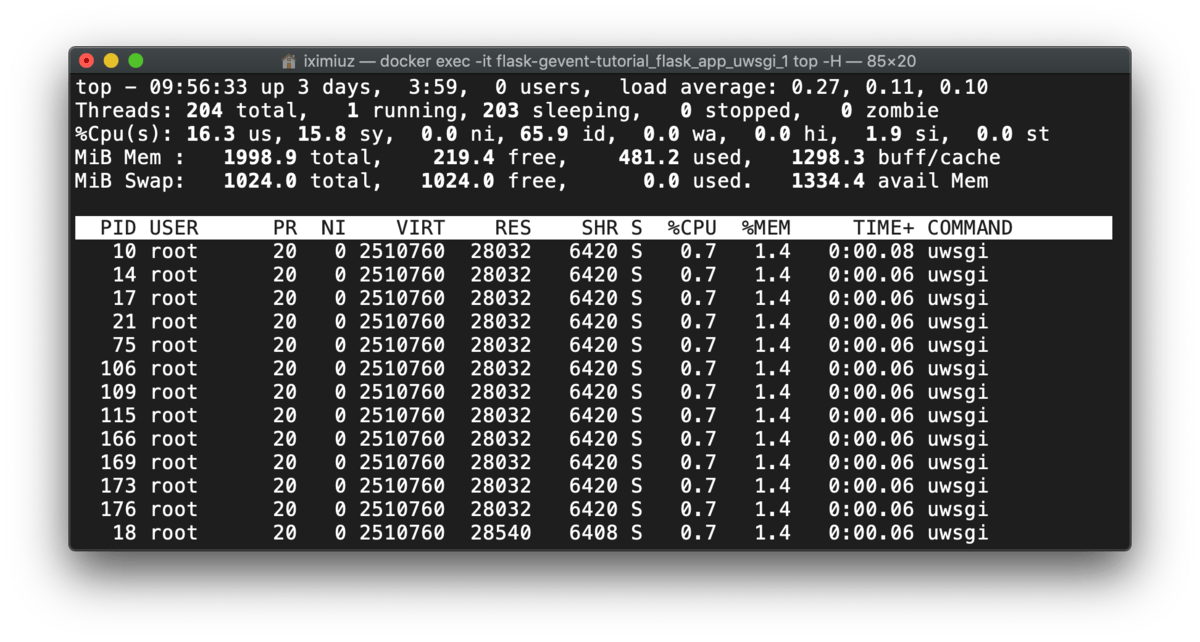
docker exec -it flask-gevent-tutorial_flask_app_uwsgi_1 top -H (during test)
Let’s proceed to the gevent mode. We can reuse the patched.py entrypoint from the Gunicorn+gevent scenario:
|
|
One extra parameter the playground sets here is the number of async cores used by gevent:
|
|
Let’s start the uWSGI+gevent server:
|
|
And do the test:
|
|
However, if we check the number of workers before and during the test we will notice a discrepancy with the previous method:
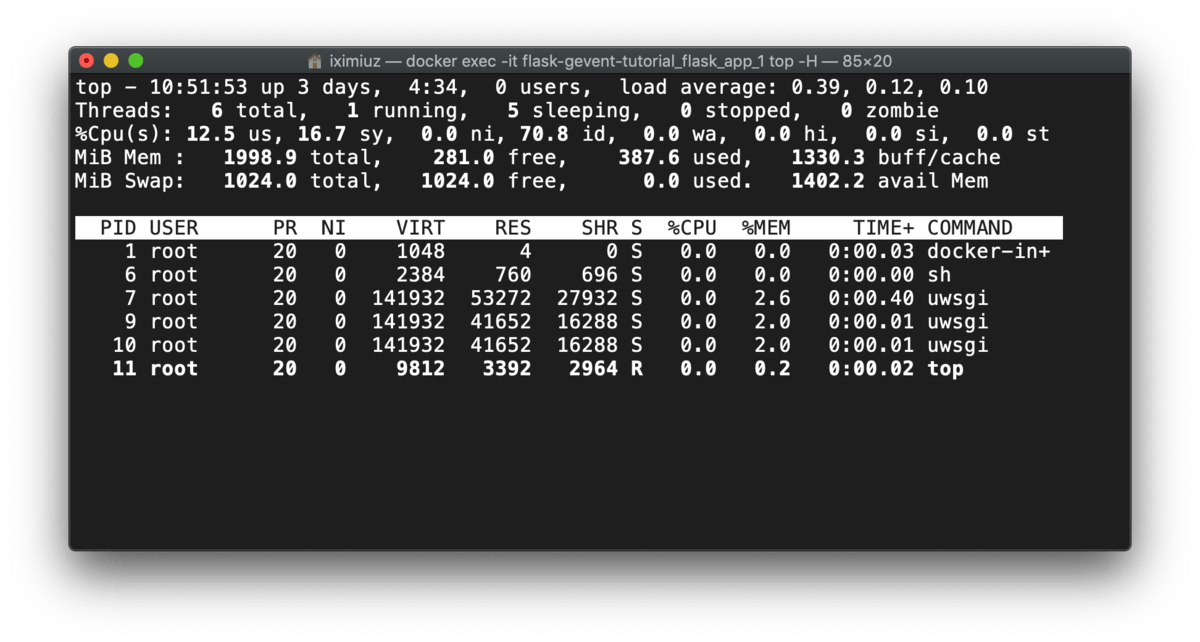
docker exec -it flask-gevent-tutorial_flask_app_1 top -H (before test)
Before the test, uWSGI had the master and worker processes only, but during the test, threads were started, somewhat around 10 threads per worker process. This number resembles the numbers from gevent.pywsgi and Gunicorn+gevent cases:
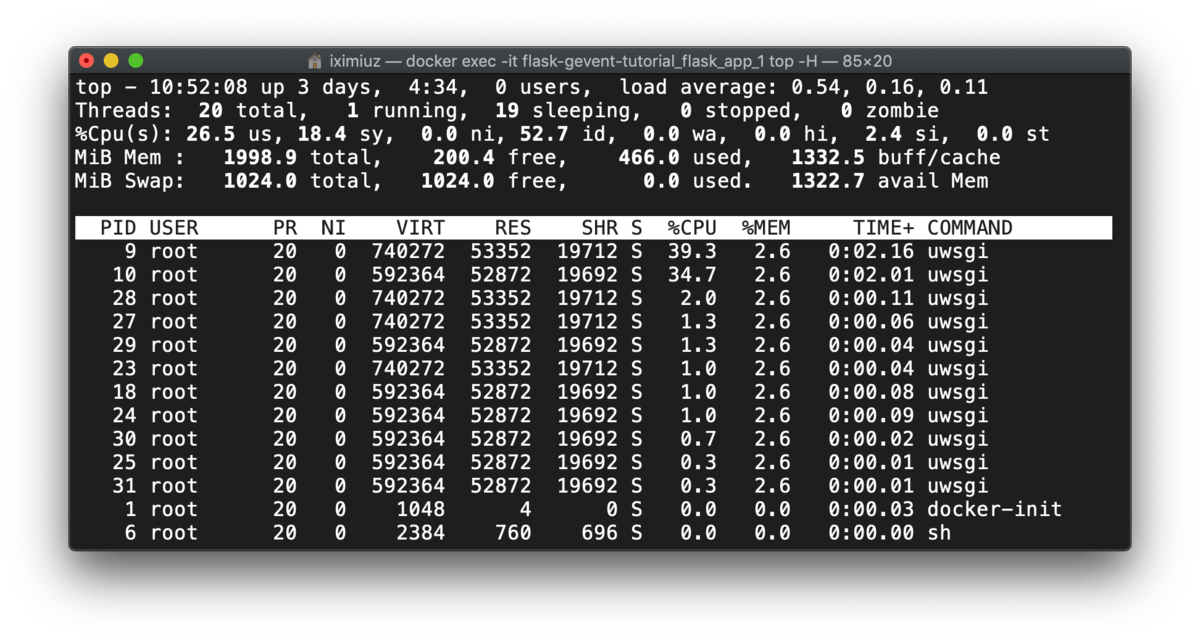
docker exec -it flask-gevent-tutorial_flask_app_1 top -H (during test)
Use Nginx reverse proxy in front of application server
Usually, uWSGI and Gunicorn servers reside behind a load balancer and one of the most popular choices is Nginx.
Nginx + Gunicorn + gevent
Nginx configuration for Gunicorn upstream is just a standard proxy setup:
|
|
We can try it out using the following playground:
|
|
And then:
|
|
Nginx + uWSGI + gevent
uWSGI setup is very similar, but there is a subtle improvement. uWSGI provides a special binary protocol (called uWSGI) to communicate with the reverse proxy in front of it. This makes the joint slightly more efficient. And Nginx kindly supports it:
|
|
Notice the environment variable PROTOCOL=uwsgi in the following playground:
|
|
We can test the playground using:
|
|
Bonus: make psycopg2 gevent-friendly with psycogreen
When asked, gevent patches only modules from the Python standard library. If we use 3rd party modules, like psycopg2, corresponding IO will remain blocking. Let’s consider the following application:
|
|
We extended the workload by adding intentionally slow database access. Let’s prepare the Dockerfile:
|
|
And the playground:
|
|
Ideally, we expect ~2 seconds to perform 10 one-second-long HTTP requests with concurrency 5. But the test shows more than 6 seconds due to the blocking behavior of psycopg2 calls:
|
|
To bypass this limitation, we need to use psycogreen module to patch psycopg2:
The psycogreen package enables psycopg2 to work with coroutine libraries, using asynchronous calls internally but offering a blocking interface so that regular code can run unmodified. Psycopg offers coroutines support since release 2.2. Because the main module is a C extension it cannot be monkey-patched to become coroutine-friendly. Instead it exposes a hook that coroutine libraries can use to install a function integrating with their event scheduler. Psycopg will call the function whenever it executes a libpq call that may block. psycogreen is a collection of “wait callbacks” useful to integrate Psycopg with different coroutine libraries.
Let’s create an entrypoint:
|
|
And extend the playground:
|
|
If we test the new instance of the application with ab -n 10 -c 5, the observed performance will be much close to the theoretical one:
|
|
Instead of conclusion
Make code, not war!